How to prepare your artwork?
You want to order a product with a print. Great! But how to prepare a print file? We will guide you. To assure a smooth and accurate printing process, there is a certain way how our print centre would like to receive your print file. Just follow the steps below and your artwork is ready to go!
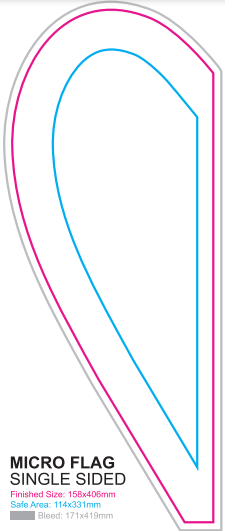
- Use the right print template
You can download all the print templates of all our products on our Online Reseller Platform. You will find them under ‘downloads’ on each product page. Or download them in bulk from this page. - Create artwork in CMYK
Our print centre is printing in CMYK colours, that is why we prefer to receive your artwork in CMYK. If you send us the print file in RBG or other colour scheme, our system will convert it to CMYK. When we convert the colours, our system will search for the closest colour match but we can’t guarantee a 100% match. If you want to be sure we print the exact colour you need, we kindly ask you to send us the file in CMYK. - Preferably in 300 DPI
To ensure your prints looks stunning, please deliver it to us in 300 DPI. For larger formats above size A1, 150 DPI would be good enough as well. Our automatic software checks every print file for a minimum resolution of 150 DPI. If the resolution is below 150 DPI, we cannot guarantee the best print quality. - Embed your images
Make sure all images are embedded and they become part of your artwork. There are no more hidden files in the template. - Convert text fonts to outlines
Do you have some important words or text in your design? Don’t forget to turn text into a visual. - Remove template lines
When your template is all set and ready, kindly remove all the template lines. All for a smooth printing process. - Save as PDF
Deliver your artwork to us in PDF format. Preferably a PDF export of PDF/X-4:2008 or PDF/x-1a:2001. And you are ready to go!
How do we check your artwork?
Standard check
Your artwork will always be checked by our automatic print software. If it meets all the minimum standards for an optimal print result, we will start printing right away. The minimal standards are: correct measurements fitting to template, minimum of 150 DPI, CMYK colours.
Manual check by print specialist
If you choose for the manual check by a print specialist, your artwork will still be checked by our software before our print specialist will do the check. Our print specialist will also review your print file for elements that our software does not see, such as ensuring the text is within the safe area and checking for the presence of a bleed. Our print specialist can make small adjustments, such as moving the text a couple of milimeters to make sure the text is within the safe area or extending the print to make sure the bleed area is covered. If we make any adjustments, we will always send the updated file to you for approval. During the manual check we guide you to make sure everything goes well. This service is especially useful if you’re unsure about your print file or when you have a large, important order with prints.
Feedback on your artwork?
After all the checks, we will provide you with feedback per e-mail. There will be 3 options possible.
- Ready to print
- Approve print or upload new file
- Upload new file
You can click on the button ‘View print proof page’ in the e-mail to check out the print proof document(s) and take the action if needed.
Ready to print
In case you receive the ‘ready to print’ mail, no further action is required on your part. You are free to go to the print overview page and check out the print proof documents.
Standard print check
If your print file is checked by our software and it passes the measurement, DPI and colour scheme tests, your print file looks perfect and is ready to print. You will receive a simple email confirming that your print file is great, and we will start printing your file as soon as possible.
Manual check by print specialist
When your print passed the automatic check by our software and it passed the test by our print specialist, you are an absolute rockstar! You will receive an e-mail your artwork looks amazing and of course we will start printing as soon as possible.
Approve print or upload new file
In case you received this feedback:
- Artwork size adapted
- Image pixelated
- Image blurry
- Text outside safe area
- Modified colours
You’re welcome to approve the print, but we can’t guarantee the best quality in this case. If you want to be sure of the best print quality, you are able to improve your artwork and re-upload it. When you upload a new file, we’ll check it again and, of course, provide you with feedback on the new file.
Upload new file
In case you receive this feedback:
- Wrong size
- Missing bleed
We ask you to improve the print file and upload the new one. These two symbols are showstoppers, meaning we can’t proceed with printing the file at all. Changes must be made before we can start printing. If you have questions, our Customer Care team is happy to assist you.
Print symbols
Image is pixelated > 150 DPI
The uploaded artwork has a DPI below 150. When printed, it may look pixelated. To ensure the best quality with sharp and clear images, please adjust your artwork to meet the 150 DPI standard. If you’re fine with receiving a potentially pixelated print, you can click on ‘Approve Print’.
Modified colours
Our printers use CMYK colours. It appears that your uploaded artwork is in RGB colours (or another colour scheme). Our system has automatically converted your RGB colours to CMYK. This may result in slight variations in colours when printed. If you are comfortable with this possibility, please click ‘Approve Print’. If you wish to ensure we print in the right colours, please adjust your artwork to CMYK colours and upload the new print file.
Size artwork adapted
The size of your uploaded artwork differs from the print template by 1-2%. Our automatic print software has adjusted the size slightly to fit the template perfectly. Please review to ensure it still appears as you expect. If everything looks good, you can click on the ‘Approve Print’ button. If you’re not satisfied with the slight modification, please adjust your artwork accordingly and upload a new print file in the correct size.
Text outside safe area
During the manual check by our print specialist, we noticed that the text is outside the safe area. Please check the print template to see what the safe area is. If the text is outside this area, we cannot guarantee it will be completely visible on the product. We recommend adjusting your artwork and uploading a new file. If it was your intention to have the text outside the safe area, please let our Customer Care team know that you approve the print proof.
Image is blurry
The uploaded artwork is blurry, which can result into an unsharp print result. You can approve the current artwork. If it was not your intention to upload a blurry image, please upload a new print file.
Backside copied
When ordering a double-sided print product, our print center needs 2 pages in 1 file, to be able to print a frontside and a backside. When you upload only 1 page file, we will make a copy of this page for you. This way we will print the same graphic for the frontside and the backside. If this is okay for you, please approve the print proof. If you want something different on the backside print, please make sure you upload 1 file which contains 2 pages. One page for the print on the frontside and one page for the print on the backside of the product. This is not valid for the Beach Flag Double-sided; you will always need to upload a PDF containing two pages for the Beach Flag Double-sided.
Wrong size
During the manual check by our print specialist, we noticed that the text is outside the safe area. Please check the print template to see what the safe area is. If the text is outside this area, we cannot guarantee it will be completely visible on the product. We recommend adjusting your artwork and uploading a new file. If it was your intention to have the text outside the safe area, please let our Customer Care team know that you approve the print proof.
Missing bleed
During the manual check by our print specialist, we noticed that the bleed is missing. The background must fully extend into the bleed area as indicated in the template. Bleed is necessary to ensure that the print covers the entire area without any white lines around the edges. If the edges should remain white, we kindly ask you to include a white layer extended to the bleed. To ensure your print is in the correct coulor and fully extends to the bleed, please adjust your artwork accordingly and upload the new print file.
Disclaimer
- Please be aware: if you approve the print as shown in the print proof, we can’t accept reclamations on the printed product.
- When uploading a new file, our automatic software will check your artwork again and give you feedback via e-mail.